As mentioned in our previous articles, accessing reliable and accurate weather data is essential for many businesses to facilitate their daily operations. Fortunately, our latest technological advancements allow developers to easily and quickly integrate this weather data into their applications using REST API technology.
Théo, our CTO, explains in this article how REST APIs work and how to get started with the FROGCAST API.

What is a REST weather API?
A REST weather API follows REST (Representational State Transfer) architecture principles, enabling applications to retrieve weather data via standard HTTP requests. By using a simple URL with specific parameters, developers can access meteorological information efficiently and reliably.
How REST architecture works
Weather conditions significantly impact numerous sectors including agriculture, transportation, construction, energy, and logistics. Access to accurate weather data enables businesses to make informed operational decisions and optimize their activities.
Simplifying weather data integration
Traditionally, developers had to collect and process weather data from multiple sources, each with different formats and access methods. This approach was time-consuming, complex, and often unreliable.
A REST weather API eliminates these challenges entirely. Developers can now request precise weather forecasts for any location through a simple API call; no graphical interface, no complex pipelines, and no data-source management required. The API handles all the complexity, providing clean, standardized data ready to use in your applications.
Overall, the REST weather API acts as an intermediary that retrieves weather data from a server and then seamlessly delivers it into a final application.
Key advantages for your projects
A RESTful API offers great flexibility :
- Reliable and up-to-date data: Access real-time forecasts powered by advanced meteorological models without managing infrastructure.
- Enhanced functionality: Enrich your applications with weather intelligence that adds tangible value for your users.
- Improved user experience: Deliver contextualized weather information directly within your application interface, enabling users to make better decisions.
- Development efficiency: The RESTful architecture means the server only communicates when requested, and you only receive the data you need. There’s no need to store intermediate files or manage multiple data sources. Maintaining access to this single API is enough, which greatly simplifies the developer’s work. They can then focus on using weather data for their own business applications.
Getting started with the FROGCAST weather API
Using a REST weather API might seem technical at first glance, but the process is straightforward. Let’s explore how to get started with the FROGCAST API.
Obtaining your weather API key
Every API request requires authentication through an API key. When you send a request to the weather API, this unique identifier verifies your access privileges and tracks your service usage for billing and monitoring purposes.
To obtain your FROGCAST API key, simply create an account at https://app.frogcast.com. Once registered, navigate to the API section at https://app.frogcast.com/fr/api/ where you’ll find your personal token.
Important security note: Keep your API key confidential. Never share it in public code repositories, client-side applications, or publicly accessible locations. Treat it like a password: anyone with access to your key can make requests on your behalf.
Making your first API request
Now that you have your API key, you’re ready to start retrieving weather data. The FROGCAST API provides forecasts up to 15 days ahead with customizable parameters to match your specific needs.
Understanding the request structure
Sending a request to the FROGCAST weather API is very simple. If you’re already logged in to your account, you can simply open a new tab and enter a URL with the following structure:
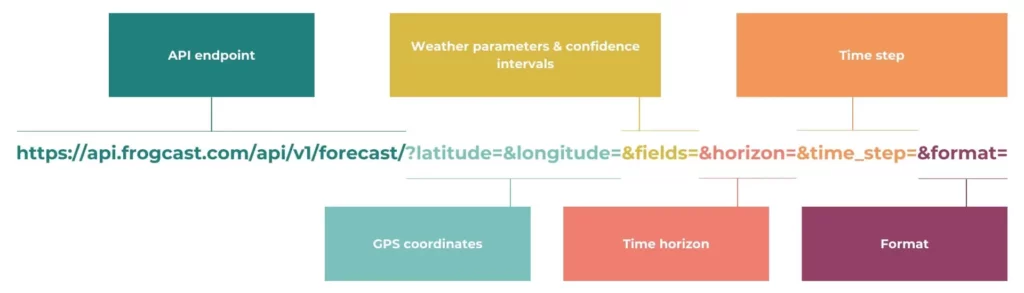
All weather forecast requests use the same base endpoint:
https://api.frogcast.com/api/v1/forecast/You then add parameters to specify what data you want. Here’s a complete example:
https://api.frogcast.com/api/v1/forecast/?latitude=45.05&longitude=5.32&fields=tcc,t2m_p80&horizon=14400&time_step=30This request retrieves total cloud cover (tcc) and the p80 quantile temperature forecast (t2m_p80) for desired location (coordinates 45.05°N, 5.32°E) over the next 10 days with a time step of 30 minutes.
Essential parameters explained
Latitude and longitude (required): Specify your location in decimal degrees. Latitude ranges from -90° (South Pole) to +90° (North Pole), longitude from -180° to +180°. Use precise coordinates for the most accurate forecasts.
Fields (required): Define which weather variables you need, separated by commas. Available options include temperature (t2m), wind speed (10m_wind_speed), solar irradiance (ghi), precipitation (mtpr), humidity (rh2m), and dozens more. To view the complete list of available variables, make a GET request to https://api.frogcast.com/api/v1/allfields/.
Horizon (optional): Defines the forecast period in minutes. Default is 21,600 minutes (15 days). Adjust based on your planning horizon. Use 2,880 for 48 hours, 10,080 for 7 days, etc.
Time_step (optional): Sets the interval between data points in minutes. Default is 60 (hourly data). Available options are 1, 5, 10, 15, 30, and 60 minutes. For sub-hourly data, the API performs interpolation. We recommend keeping the hour as the working base.
Format (optional): available options are default and JSON. We recommend using JSON.
Precision (optional): Controls decimal places in numerical values. Default is 2 decimal places. Adjust based on your precision requirements.
Implementing the API in your code
While you can test API calls directly in your browser when logged in, production applications should authenticate using the authorization header. Here’s a practical Python example:
import pandas as pd
import requests

# Set up authentication
headers = {'Authorization': 'Token {your_api_token}'}

# Define the API endpoint
url = 'https://api.frogcast.com/api/v1/forecast/'

# Configure your request parameters
parameters = {
    'latitude': 45.63562,
    'longitude': 5.63256,
    'time_step': 60,
    'horizon': 2880,  # 48-hour forecast
    'fields': 'ghi,t2m,10m_wind_speed'
}

# Make the request
response = requests.get(url=url, params=parameters, headers=headers)
api_data = response.json()

# Convert to pandas DataFrame for easy analysis
forecast = pd.DataFrame(
    data=api_data['data'],
    index=api_data['index'],
    columns=api_data['columns']
)

print(forecast)
This example demonstrates how to structure your request, handle authentication, and organize the response data into a pandas DataFrame (a standard format for data analysis in Python).
Understanding API responses
When your request succeeds, the API returns an HTTP 200 status code along with your weather data in JSON format.
Response structure
The JSON response contains three main components:
- Index: Contains timestamps for each forecast point, formatted in ISO 8601 UTC (e.g., “2024-02-16T14:00:00Z”) or as Unix timestamps if specified.
- Columns: Lists the weather parameters you requested, serving as column headers for the data.
- Data: Contains the actual forecast values, organized as a matrix where each row corresponds to a timestamp and each column to a weather parameter.
To use this data in your application, you will need to extract the information you need. Many programming languages allow analysis of JSON data, so choose the one that best suits your needs.
Handling errors effectively
The FROGCAST API uses standard HTTP status codes. Codes in the 2xx range indicate success, while 4xx codes signal request errors (missing parameters, invalid authentication, etc.). Implement error handling in your application to catch these scenarios and provide meaningful feedback to users.
Single API request for all your weather variables
One of the FROGCAST API’s key advantages is efficiency. You can request multiple weather parameters for a single location in one API call, rather than making separate requests for each variable.
For example, instead of making three separate calls for temperature, wind, and precipitation, combine them in a single request:
fields=t2m,10m_wind_speed,mtprThis approach reduces latency, simplifies your code, optimizes your API quota usage, and improves overall application performance.
Conclusion
The FROGCAST REST weather API provides developers with a powerful yet accessible solution for integrating accurate weather data into their applications. With straightforward authentication, flexible parameters, and reliable data delivery, you can quickly add weather intelligence to your projects.
Start testing today
Ready to integrate weather forecasts into your applications? Create your free FROGCAST account at https://app.frogcast.com in just 2 minutes. You’ll receive immediate access to your API key, 400 free requests and can start testing our accurate weather data right away.
Whether you’re building agricultural planning tools, logistics optimization systems, or any weather-dependent application, the FROGCAST weather API delivers the meteorological intelligence you need.